
Everyone has a Smartphone. Some people own Smart Speakers. You and I have Smart Collections! Of all the "smart" labeled things in this world I would argue that none is better than the Smart Collection. So what makes a Smart Collection so "smart"? Well, let's talk about that!
We have already discussed regular old Collections and those are great - you can put any images you want into them - but Smart Collections take Collections to the next level. Instead of you selecting the images for the Collection, Lightroom selects the images for you - based on criteria you input.
To create a Smart Collection you can tap on the "+" next to the word Collections in the left panel and select "Create Smart Collection" or go the Library Menu at the top of your screen and select "New Smart Collection". Either way you will get the same result, a dialog box that allows you to input the criteria to filter the images for your Smart Collection (see image below).

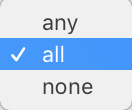
And this dialog box is where you get to set the specifics of the Smart Collection - and you can set A LOT. But before you start setting the criteria for your Smart Collection there are two options to be aware of. One is "Location" and that allows you to pick which, if any, Collection Set you want your Smart Collection to be a part of. The second, and this one is very important, is the "Match" option. You will have three options to choose from - Any, All and None. "ALL" is the default and this tells Lightroom that you want your images in the Smart Collection to match ALL of the criteria you input. You can think of the "All" option as AND - the criteria has to be this AND that AND the other. Another option is "ANY" and this tells Lightroom to match ANY of the criteria you input. You can think of the "ANY" option as OR - the criteria has to be this OR that OR the other. So the "ALL" option will give you more specific results. The final option is "NONE". This option simply excludes the criteria you input. For example, if you set the Label Color to Red and have NONE as the Match option then you will have a Smart Collection of images that DO NOT have a Red Color Label. My preference is to have "ALL" selected as the Match option.

Then once you have the "location" and "Match" options set, it's time to submit your criteria. Now I am not going to go into all the criteria you can enter, I will just say that there is a plethora of options for creating your Smart Collection. You can use Labels or dates or lens type location and on and on and on. You can get really specific, or you can leave it fairly broad - it's up to you! You can create as many Smart Collections as you want - just like you can create as many Collections and Collections Sets as you want.
A couple tips for making Smart Collections work to the best of their ability - ALWAYS use keywords. We've discussed before how important keywords can be and when using Smart Collections it be quite helpful to filter via keywords. Make sure you that your camera info is correct! Double check the date and time in your camera's settings so that you can create accurate dated Smart Collections. Also, be sure other metadata is correct - lens type for example - as you can create Smart Collections based on Lens Type. If you all your info and metadata is accurate your Smart Collections will be brilliant 😉(see what I did there? Smart / Brilliant )
So really how you use a Smart Collection is up to you and I can't tell you a right or wrong way to use them. But I assure you that if you explore them a bit and try them out and test different attributes/criteria for your Smart Collections, you will wonder how you ever lived without them! So now that you're done reading this blog post quit procrastinating and go make a Smart Collection!